Guides · Guide 01
How to draw a lighting plot
A lighting plot is a top-down drawing of a space showing where every fixture goes, what it is, and roughly what it does. Its only job is to let somebody who was not in your head rig the room correctly.
What has to be on it
Strip away style and a plot that works has six things on it. Miss one and someone will ring you at seven in the morning.
- The room, to scale. Walls, doors and windows, with at least one dimension written on it. Scale is what makes the rest measurable rather than decorative.
- Every fixture, named. L1, L2, L3. The name matters more than the symbol, because the name is what gets written on tape and shouted across a room.
- What each fixture is. "Fresnel" and "LED panel" are different rigs, different power and different stands. A dot with no type on it is a wish, not a plan.
- Height. A 2.4 m fixture and a floor-level fixture are completely different pictures. One number per unit.
- Rough direction and coverage. Not a photometric calculation, just enough that a spark can see the unit is aimed across the room rather than at the wall behind it.
- Where the camera is. Lighting only means anything relative to the lens. A plot with no camera on it cannot be checked for a unit in shot.
Draw it in this order
1. The room first, and get it roughly right
Pace the location or read the floor plan. A metre either way will not hurt you; three metres will. Draw the walls, then cut in the doors and windows, because practical light and actor entrances both come through them.
2. Put the camera down before any light
Light is a function of the lens. Place the camera, set the focal length you expect, and look at what the frame actually contains. On a 24 mm in a small kitchen, half the room is in shot and you have far fewer places to hide a stand than you think.
3. Key, then fill, then edge
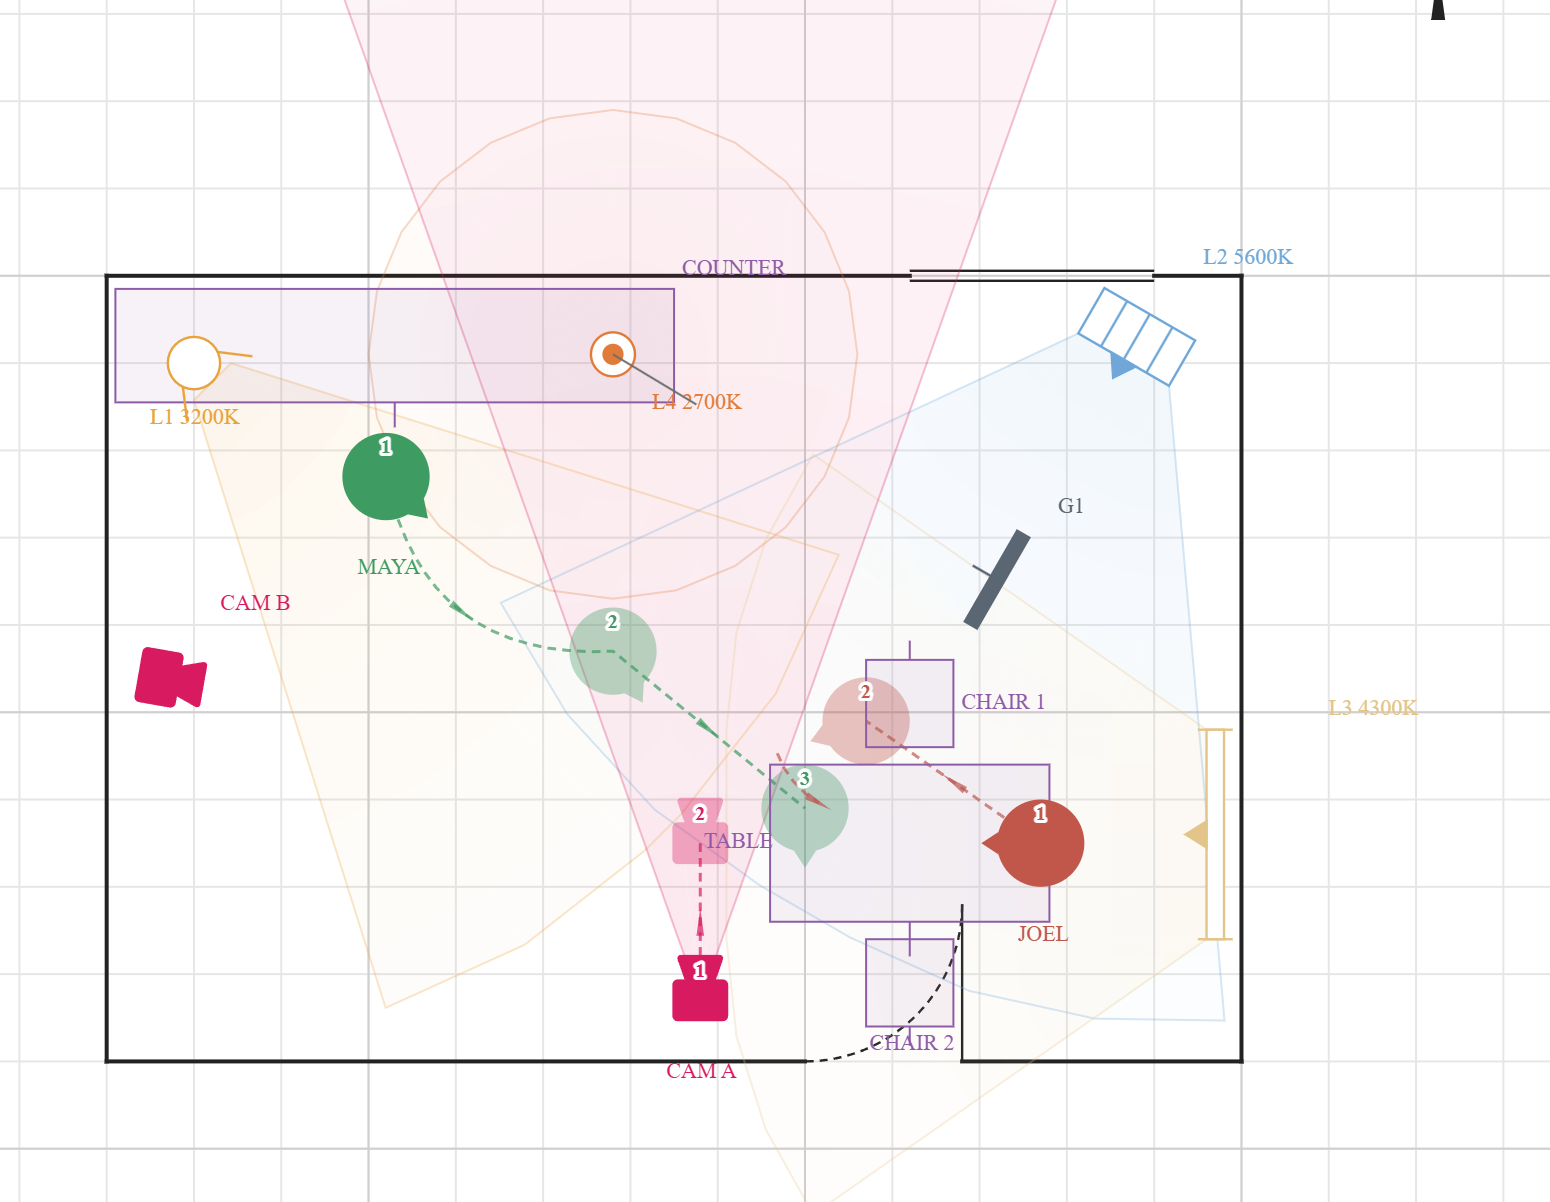
In the example above, L1 is a fresnel keying from the front left of the actors: hard enough to have a direction, angled in so the shadow falls away from camera. L2 is an LED panel coming in through the window on the opposite side at 5600K, the daylight source, lifting the shadow side without inventing a second key, with a flag on it to keep it off the back wall. L3 is a four-foot tube on the right wall, edging the actors and separating them from the background.
Three units is usually the honest answer for a small interior. Draw those, see whether the picture is already there, and only then add.
4. Write the heights on
Fixtures at 2.4 m in a room with a 2.5 m ceiling is a real constraint that only shows up if you wrote the number down. Heights also tell the gaffer what stands to bring.
5. Check for units in shot
Look at the camera's coverage and see what falls inside it. This is the single most common reason a plot gets redrawn at the location, and the cheapest thing in the world to catch at a desk.
Symbols: use whatever the crew reads
There is no universal film-lighting symbol standard the way there is in theatre. What matters is that the shape suggests the unit and the legend explains it. A four-foot tube drawn as a four-foot line is instantly readable; the same tube drawn as a circle is not.
If you are drawing by hand, keep a consistent set and put a key in the corner. If you are using a tool, it should be doing this for you: here is what that looks like exported, legend and schedule included.
The part people skip: the schedule
A drawing shows where. A schedule, one line per unit, with its name, type, height and any note: shows what. Between them a gaffer can pull the right gear from the truck before walking into the room, which is where the plot actually saves you time.
The plot above is a fuller version of the same idea, four fixtures, two cameras and the actors' marks on the one sheet. A plain key/fill/edge takes a few minutes. See the finished sheet and its PDF.
Next
How to make a blocking diagram, the same drawing, but showing where the actors move.